Smarthjemintegrasjon forbedrer bekvemmelighet og effektivitet, slik at brukerne kan kontrollere flere enheter fra én plattform.Smarte ting, utviklet av Samsung, er et av de kraftigste smarthjem-økosystemene, som muliggjør sømløs enhetsadministrasjon og automatisering.
For huseiere som bruker enSmart termostat for gulvlister, integrere den iSmarte ting via SmartLifetilbyr sentralisert kontroll, automatisering og energisparingsmuligheter. Prosessen kan imidlertid være kompleks på grunn av problemer med kompatibilitet på tvers av plattformer.
Denne guiden vil lede deg gjennomtrinnvis prosessmed å koble dinSmart termostat for gulvlistertoSmarte tingvia SmartLife, som muliggjør fjernkontroll av temperatur og intelligent automatisering.
1. Forutsetninger for SmartThings-integrasjon
Før du fortsetter, sørg for at du oppfyller følgende krav:
✅En registrert SmartThings-konto(tilgjengelig på iOS og Android).
✅SmartThings-appen installert på smarttelefonen din.
✅En smart gulvmontert termostat kompatibel med SmartLife.
✅SmartLife-konto og appoppsett(termostaten skal allerede være lagt til i SmartLife).
✅Stabil Wi-Fi-tilkobling (2,4 GHz anbefales for IoT-enheter).
2. Kobling av SmartLife til SmartThings
For å integrere termostaten må du førstkoble SmartLife-kontoen din til SmartThingsDette trinnet gjør det mulig for SmartThings å oppdage og kontrollere enheter som er registrert under SmartLife.
2.1 Koble SmartLife til SmartThings
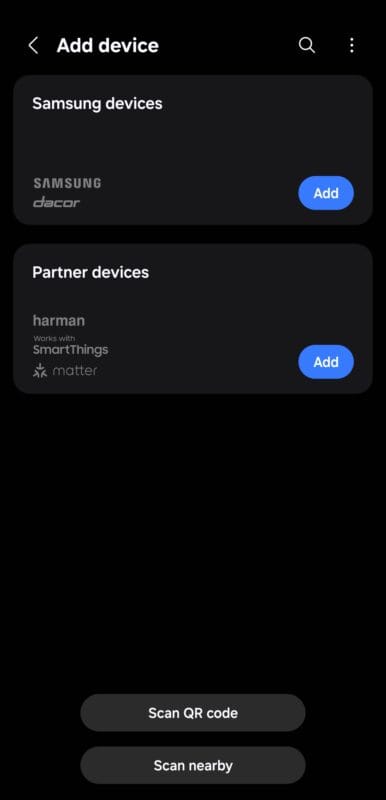
1️⃣Åpne SmartThings-appen og «Legg til enhet»
- LansereSmarte tingappen på mobilenheten din.
- Trykk på+ menyikon(øverste høyre hjørne).
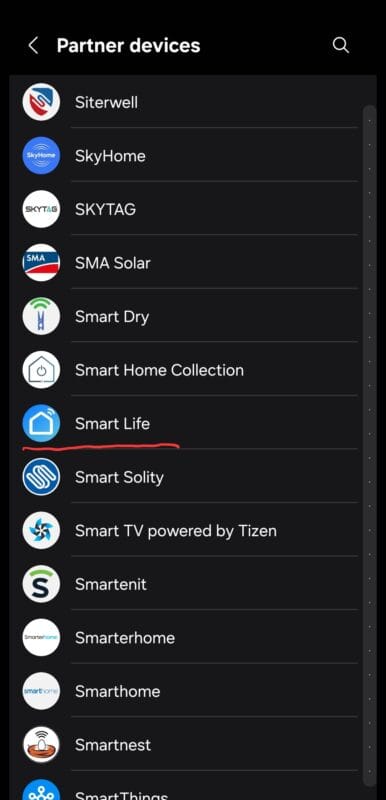
- Velge«Legg til enhet»→«Partnerenheter», og søk etter«Smart liv».
2️⃣Legg til SmartLife som en tilknyttet tjeneste
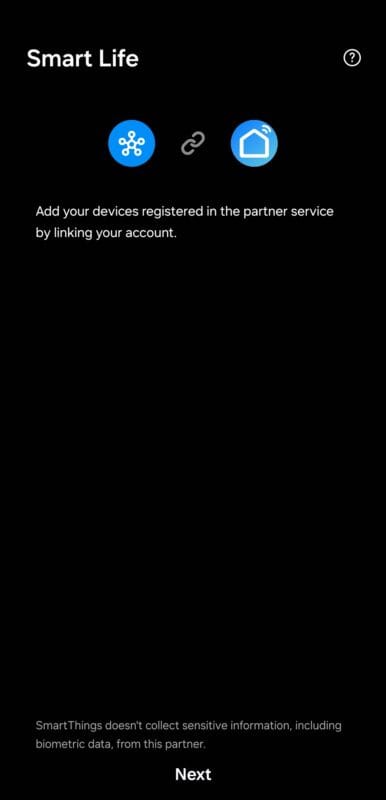
- På siden som åpnes, klikk på Neste.
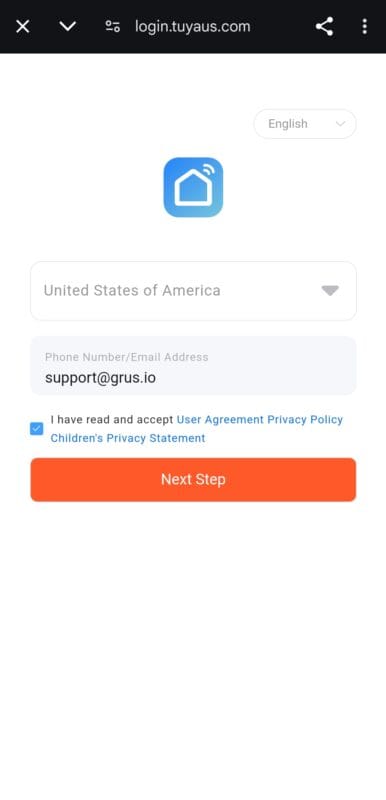
- Logg inn med dinSmartLife-legitimasjonog tillate tilgang.
- Etter at du har logget deg inn, trykker du på"Autorisere".
3️⃣Synkroniser enheter med SmartThings
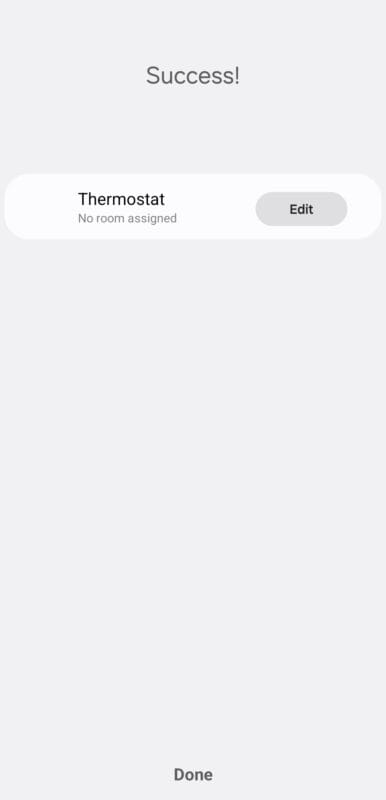
- På suksesssiden ser du termostaten, og du kan redigere navnet.
- Etter at du har trykket på «Ferdig», vil dinSmartLife-enheter vil synkroniseres med SmartThings.
- Vent noen øyeblikk mens enhetene lastes inn i SmartThings.
🔹NoteHvis termostaten din ikke vises i SmartThings, kan du prøveoppdaterer enhetslistenorkoble tjenesten på nytt.
3. Verifisering av termostatintegrasjon i SmartThings
Etter at SmartLife er koblet til, skal termostaten nå væresynlig i SmartThingsFølg disse trinnene for å sikre en vellykket integrering:
3.1 Finne termostaten i SmartThings
- Gå til SmartThings-startskjermen.
- Sveip ned for å oppdatere enhetslisten.
- Finn din smarte gulvlistertermostat under «Enheter».
Hvis det ikke er synlig:
✅Bekreft at SmartLife er riktig koblet til i SmartThings-innstillingene.
✅Sørg for at termostaten er online i SmartLife før synkronisering.
✅Start SmartThings-appen på nytt og oppdater enhetslisten.
3.2 Testing av grunnleggende kontroller
Når den er oppdaget, test termostatens funksjonalitet:
| Trekk | SmartThings-appkontroll |
|---|---|
| Juster temperaturen | Øk/reduser måltemperaturen |
| Bytt modus | Varme, kjøle, automatisk eller av |
| Sjekk gjeldende temperatur | Se romtemperatur i sanntid |
| Planleggingsautomatisering | Angi rutiner for oppvarmingssykluser |
Suksess!🎉 DinSmart termostat for gulvlisterer nåfullt integrert i SmartThings.
4. Lage smarte automatiseringer i SmartThings
Nå som dinSmart termostat for gulvlisterer integrert iSmarte ting, kan du oppretteautomatiseringerfor å optimalisere energiforbruket, forbedre komforten og personlig tilpasse klimakontrollen.
SmartThings-tilbudtilpassede automatiseringsrutinerbasert på forhold som:
✅Tidsbaserte tidsplaner(f.eks. lavere varme om natten).
✅Stedsbaserte utløsere(f.eks. juster temperaturen når du forlater/kommer hjem).
✅Sensordrevne justeringer(f.eks. kobling til bevegelses- eller temperatursensorer).
4.1 Konfigurering av smarte automatiseringer
For å lage automatiseringer iSmarte ting, følg disse trinnene:
1️⃣Åpne SmartThings-appen
- Naviger til«Automatiseringer»→ Trykk«+ Legg til automatisering».
2️⃣Velg en utløser («Hvis»-betingelse)
- Velg en tilstand som vil utløse termostaten. Eksempler:
- Tid på dagen(f.eks. lavere varme om natten).
- Geolokalisering(f.eks. slå av varmen når alle forlater hjemmet).
- Temperaturterskel(f.eks. slå på varmen når temperaturen er under 18 °C).
3️⃣Velg termostathandling («Så»-betingelse)
- VelgeSmart termostat for gulvlister→ Juster ønskettemperatur, modus eller strømstatus.
4️⃣Lagre og test automatisering
- Lagre innstillingene og kontroller om termostaten følger automatiseringsreglene.
4.2 Eksempel på automatiseringer for energisparing
Eksempel 1: Angi oppvarmingsplaner for komfort og effektivitet
📌Mål:Reduser oppvarmingskostnadene ved å automatisk senke temperaturen om natten og varme opp før du våkner.
| Tid | Termostatens handling |
|---|---|
| 6:30 AM | Varme PÅ (21°C) – Morgenoppvarming |
| 8:30 AM | Varme AV (16 °C) – Forlater hjemmet |
| 6:00 PM | Varme PÅ (22 °C) – Kveldskomfort |
| 11:00 PM | Varme AV (17 °C) - Nattmodus |
gantt
    title Daily Thermostat Automation
    dateFormat  HH:mm
    section Heating Cycle
    Morning Warm-up :done, 06:30, 08:30
    Energy Saving Mode :active, 08:30, 18:00
    Evening Comfort :done, 18:00, 23:00
    Night Mode : 23:00, 06:30
✅Fordel:Sparer energi uten å ofre komfort.
Eksempel 2: Geofencing – Juster termostaten automatisk når du forlater/ankommer hjemmefra
📌Mål:UseSmartThings geolokaliseringå slå av varmen når du forlater hjemmet og fortsette når du ankommer.
Trinn:
1️⃣Opprett en automatiseringsregeli Smarte Ting.
2️⃣HVIS-tilstand: Alle familiemedlemmer forlater hjemmet.
3️⃣SÅ handling: Slå AV termostaten eller still inn ECO-modus.
4️⃣Opprett en annen automatisering:
- HVIS-tilstand: Noen kommer hjem.
- SÅ handling: Gjenoppta termostatoppvarming.
sequenceDiagram
    participant User
    participant SmartThings
    participant Thermostat

    User ->> SmartThings: Leaves home
    SmartThings ->> Thermostat: Adjust temperature to ECO mode
    User ->> SmartThings: Arrives home
    SmartThings ->> Thermostat: Restore previous heating settings
✅Fordel:Reduserer automatisk oppvarming når det ikke er behov for det.
4.3 Koble smart baseboardtermostat til stemmeassistenter
Hvis SmartThings-kontoen din er koblet tilAlexa eller Google Assistant, kan du styre termostaten din via talekommandoer.
Slik aktiverer du stemmekontroll
1️⃣Åpne Alexa/Google Home-appen→ Gå tilInnstillinger.
2️⃣Finn «Tilknyttede tjenester»→ Legg tilSmarte ting.
3️⃣Autoriser enhetssynkronisering→ Sørg for atSmart termostat for gulvlistervises.
Eksempel på talekommandoer
📢«Hei Google, sett termostaten til 22 grader.»
📢«Alexa, slå av gulvvarmeren.»
graph LR
A[User Voice Command] -->|Alexa/Google Assistant| B(SmartThings)
B -->|Sends Action| C(Smart Baseboard Thermostat)
✅Fordel:Håndfri kontroll og forbedret tilgjengelighet.
5. Feilsøking av vanlige problemer
Hvis dinSmart termostat for gulvlisterikke fungerer som forventet i SmartThings, kan du prøve disse feilsøkingstrinnene:
5.1 Enheten vises ikke i SmartThings
✅Løsning:
- SikreSmartLife er riktig koblettil SmartThings.
- Start på nyttSmartThings-appenog oppdater enhetslisten.
- Bekreftetermostaten er på nett i SmartLifefør synkronisering.
5.2 Automatisering utløses ikke riktig
✅Løsning:
- Sjekk omgeofencing/posisjonssporinger aktivert i SmartThings.
- Bekreftautomatiseringsforholder riktig konfigurert.
- SikreSmartThings har de nødvendige tillatelsene(f.eks. lokasjonstjenester).
5.3 Talekommandoer fungerer ikke
✅Løsning:
- Sørg for at SmartThings er riktig koblet tilAlexa/Google Assistent.
- Sjekk omtermostatnavn samsvarerden i SmartThings.
- Start på nyttstemmeassistent-app og synkroniser enheter på nytt.
Sømløs termostatkontroll med SmartThings
Ved å følge denne veiledningen har du lykkes med å:
✅Koblet en smart baseboardtermostat til SmartThings via SmartLife.
✅Sett opp automatiseringer for temperaturkontrollog energieffektivitet.
✅Integrerte geolokasjonsbaserte varmejusteringer.
✅Aktivert stemmekontroll med Alexa/Google Assistant.
💡Siste tips:For maksimal energibesparelse, brukSmartThings energiovervåkingfor å analysere varmemønstre og optimalisere termostatinnstillinger!
🚀 **Klar til å forvandle oppvarmingsopplevelsen din hjemme? Sett oppSmart termostat for gulvlisteri dag!
